Monday, June 30, 2008

Please Welcome A New Brother...

At the office, it's no longer a secret that I am cyclist. And it's gradually spreading. The latest one is a colleague who also happen to live in BTP, home of the BBB. It was no surprise when he came to me for a bike.

It's common for newbies to feel surprised by the price of bicycles. SInce he said his budget is very tight, I recommended him the best his money can buy...Proton T-Blaze. However, there was some snag. My regular supplier, Mr Beskal, said T-Blaze is no longer available. Hmmmm...some phone calls later, I managed to get 1 unit for him. The last one at Bicyclette Boutique, Kelab Ukay. (yeah...there's a small bike shop in that club itself. Go check out some serious steel rig there). Order was made and deal confirmed. Major was kind enough to throw in a water bottle worth RM20.00 to the package.

Saturday, June 28th. Delivery was made. Another cyclist is re-born...Let's see how long can the T-Blaze retain its stock parts....

The handing over ceremony


Comes complete with user manual


Trying out for the first time

I wish a very warm welcome to Bro Gee to the world of cycling. Quickly get your behind seasoned. Then we can go hit the terraces of LTM.

Coil Shock for T-Bolt

I've been asked whether there are other shock upgrades for T-Bolt besides the air shock. I ain't no expert. I can't just pluck out the answer. When visiting a fellow Bolter after he was blessed with another sweet daughter, I caught the sight of his Bolty equipped with a coil spring shock.

DNM Torch Coil Shock.


Not much detail acquired. He also can't remember much. Set was puchased via BicycleBuySell. He switched from DNM Backdraft Air to Torch coil because of his weight. Note the coil is pre-loaded to the max for max stiffness. Let your imagination run wild as to the size of the owner. It comes with rebound adjustment.

A quick www search also didn't yield much results. Even it's manufacturer website DNM Website did not say much.

If you happen to have details aboout this shock, please be kind enough to share with us.

Tuesday, June 24, 2008

LTM Terrace Drops Beckoning...

Intro...


The Class

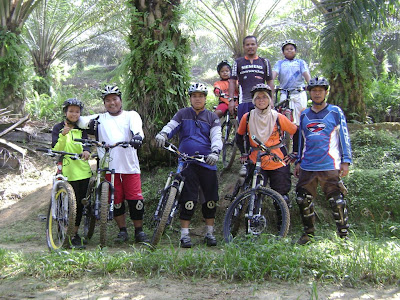
Back, from left. Daniel (Deputy Principal), Hashim BB Degawan (Principal), Fazmi Kelawar.
Front, from left - Fifi Kelawar, Kelawar, IkanBilis, UmmuFikri and me...


June 20th, Saturday. It has been more than a month since I last went to Ladang Tuan Mee, my early playground. A vast palm estate with rich variety of terrains. Adrenaline junkie would be crazy over its terrace drops. That was the main reason why I returned...My wife's growing desire to ride and to attempt a more challenging terrain compounded that. The terrace drops beckoning.

We arrived around 0800 at the usual congregation place - Zul's stall at Medan Puteri. Not many riders for the day - Kelawar and his two children, Fifi and Fazmi. The regular LTM kaki, Hashim BB Degawan and his son Daniel. Also itching for the ride was IkanBilis. Few other riders were also present but only for having breakfast at Zul's and to see us off into the depth of palm trees of Ladang Tuan Mee.

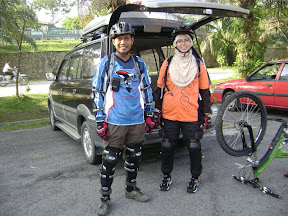
Show off - me with Axo knee and elbow pad. Missus with Fox knee and elbow pad.
After a snappy breakfast, we geared up. Time to show off our knee-pads and elbow pads. Don't be deceived by our appearance. We are no hardcore riders, just coupla old coots who are scared of injury. Must be careful. Safety first. I'm still short of full face helmet and body armor.

Today's ride will be different. Different in the sense that we will be taking extra times to learn to tackle the technical sections. It'll be some sort of class, if I may say so. Hence, I dub this ride, Akademi Fun-teres-sia LTM 08.

To The Classroom...


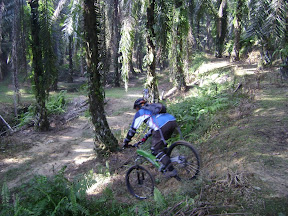
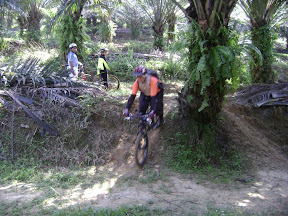
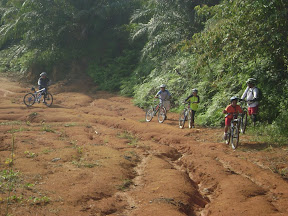
Entering the vast "classroom". The welcoming mat was not pretty.
We started off at 0900. From Medan Puteri into the depth of LTM via Block 6. After warmed up (and getting out of breath, courtesy of the welcoming mat), Hashim BB had a flat.

I decided not to let the time just pass by while Hashim fix his flat. There were shallow terraces about a foot to two feet high. Enough for introduction and tackling drop 101. I demonstrated how to roll down the drop. Stressing the importance of shifting the weight to the rear.

Everybody got excited and took turns in trying. Simple enough and everybody passed. My wife wanted to get a taste of rolling down on a full-susser. She checked her pads, mounted my green ogre and roll to the drop. Everything was fine until suddenly when the front tire hit the bottom, it bucked and locked and she went crash-boom-bang. Her first endo! I was worried that she might become scared and discouraged because of that but fortunately her spirit was not hampered. Good girl. The pads smeared. A sign of officiation. At least it proved its effectiveness.

Hashim BB finally got his tire fixed and we moved on to what we call Terrace 3.


Terrace 3

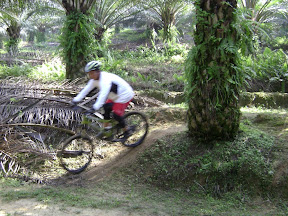
Rolling down the earlier section of Terrace 3.
Terrace 3 comprises of two sets of terraces separated by a fire road. The former section is not so steep but not less challenging either. Though lacking in steepness, the trail was marred with ruts due to water flow erosion. False move, you'll endo because of the gaping holes at the bottom of the drops created by mass of water during heavy rainfall.

The latter offers more challenges in terms of steepness. Both section never fail to incite my apprehension.


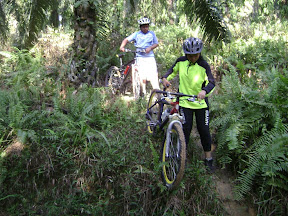
If you cannot roll down on the bike, roll down beside the bike. Improving the push-thy-bike-down-the-slope technique
It was here where the class really started. You can either join the rolling group or the pushing group. Hey...pushing also require the correct technique! The kids, except for Daniel, opted for the pushing. Ditto my wife. IkanBilis braced himself and summon all his courage for the rolling group. Kelawar, who had been absent from the scene for 3 months due to injury, was excited to make a return. He too, went for the rolling group.


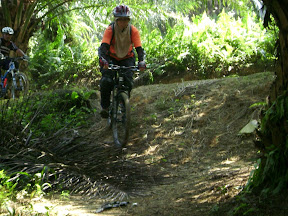
IkanBilis flowing down the drop with grace...
In the many previous rides before, though traversing the same trail, riders were left on their own. Objective was more on completing the trails and to return to the RV. The skillful will do it astride their steeds whilst the less skillful would be dismountin biking rather than mountain biking.

So for that day, we made some differences. Hashim BB was given the task of Principal. To observe and to teach riders on the proper technique of tackling drops. Riders were allowed several attempts until they were successful or they finaly wave the white flag.

Lis confessed that such approach made him feel more confident, thus, he succeeded in conquering sections that usually make his knee wobble.

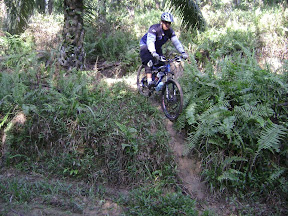
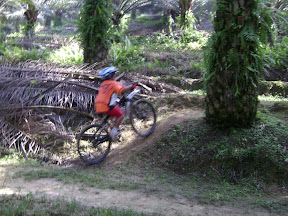
The second leg of terrace 3, steep, short and fast drop.
The second section of terrace 3 open with a steep 3 feet drop. Difficulty compounded by water erosion. One has to tread the line carefully, which is barely visible underneath the fern, to avoid getting the front tire locked. That spot claimed many casualties. Still managed to evoke fear and not to be taken lightly.

Hashim and Daniel practically glided through all the drops. LTM terraces is their regular haunts and they know the trails like the back of their palm.

Seeing all the excitement, my wife decided to change mode from dismountin to mountain bike. All the attempts were not successful. I kept on motivating and encouraging her...Perhaps, she was still traumatized after her first endo.


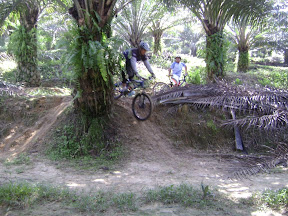
Swooping down the long finale...woo...hooo..
The icing on the cake...The grand finale of T3 is this swooping descent. Opens with 1/3 steep then gradual sloping. Kelawar was beaming when he completed it. It appeared that it was first successful attempt. Well done dude!!!

Lis hesitated and conceded in the end. My wife wanted to try but all went wrong and she couldn't pull through. As consolation, I assisted her to savor the last one third of the trail. Hmmm....


The Playground...


Hashim observed the performance of all the students at T3. He decided to go to The Playground where students can be exposed to more familiarisation. The Playground, aptly named, is a section rich with multitudes of drops from entry to intermediate level. Students were put through their "homework" rigorously to polish and hone their skills.


Kelawar getting the hang of it...

Daniel going against the current

Daniel showing the right way to do it

Lis upping his ante with steeper decline

Missus doing her assignment

Fifi not to be outdone. She showed impressive progress.


Terrace 2...


Having satisfied that students had achieved the expected level of skills, Hashim commanded the class to move to the testing ground, Terrace 2.

Unlike T3, Terrace 2 has something extra to offer. A climbing section. Moderate steps of coupla feet climb to warm up the legs muscle before rolling down the 2 section terraces. What was learned at The Playground will be put to test.

The first section can be considered mild. Students managed to tackle all the drops. Well, almost.


Last drop for section 1 at T2. Sign of satisfaction displayed on those who succeeded in tackling the drops.


Missus tackling the drop

Missus tackling another drop at section 1 of T2.


All was well in section 1 of T2. The ambience changed when the curtain to section 2 of T2 unveiled.


Section opens with quite steep descent with small gap at the end. The terrace was about 8 feet wide not allowing much room for recovery if you overshoot. Most students resorted to descent via another alternative path.


Lis braved himself to tackle one of the slope and was proud with his achievement.

What you'll see next won't be pretty. Missus succumbed to the small drop and kissed the earth. Not once but twice, But I admired her spirit. Still managed to just laugh it off. I thought she was gonna be "serik" but she tried another slope thereafter...and crashed again. Fortunately, she got herself protected with additional protection. The knee pad and elbow pad helped to reduce injury.


End of T2 marked completion of the "dera" session. General comments from participants were positive. More ssimilar sessions should be held so that skills can be upgraded.

We adjourned to Tasik Biru to help ourselves with the exotic "Air Kelapa Gula Merah" . Truly refreshing...The accompanying cendol was also sumptuous. Yummmmmm....


The exotic Air Kelapa Gula Merah. Concoction of young coconut juice, with peels of its flesh sweetened with brown sugar.

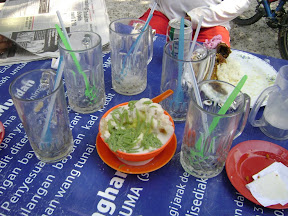
Cendol...Cordoned by empty glasses of coconut juice and emptied saucers that used to cantain delicious pau (dumpling)

Friday, June 20, 2008

Dilema Sarang Botol T-Bolt

Rasanya semua Bolters menghadapi masalah ni. Tempat yang disediakan bolt untuk sarang botol merupakan tempat berkumpul segala tanah, selut, lumpur dan segala macam renjisan dari tayar depan. Kat situlah juga nak diletak botol air...Bayangkan bila nak minum air nampak segala macam eeeeuuuwwww.

Kalau berkayuh pakai beg pundi tak la terasa sangat. Tapi...kadang-kadang nak kayuh santai jarak dekat isi masa ruang petang-petang, takkan nak usung beg jugak...Leceh lagi mematahkan pinggang.

Alternatif lain, pasang sarang botol kat belakang pelana. Sarang botol boleh dipasang ke pancang pelana menggunakan braket pengapuk. Iyalah...botol masih lagi dalam zon "sudut sembur" tapi tak la seteruk dan senazak kalau bawah tiub bawah tuuuu...Braket untuk kapuk ke pancang pelana tu ada dijual.

Ha...macam ni la rupanya bila dah siap dipasang.


Kita zoom masuk tengok jarak dekat sikit

Boleh juga dipakai pada mana-mana basikal asalkan ada pancang pelana (seatpost la tuuuu..) Untuk Bolters, dicadangkan elok pasang se atas mungkin supaya pelana boleh direndahkan serendah mungkin bila terjumpa cerun lazat.

Yang ini jenama Minoura dari Jepang. Beli kat Samy Batu Caves. Harga RM22.00. Sekupangpun tak kurang tak lebih. Harga braket tu aja tau. Tidak termasuk sarang botol...

Selain di pancang pelana, braket ini boleh juga di pasang di palang hendal. Ikut selera masing-masinglah.

Friday, June 06, 2008

Eh...Macam Kenal!!!???

Cuba tengok gambar siapa yang hensem ni. Bukan...bukan yang sebelah kanan tu. Yang sebelah kanan tu mana ada hensem. Tu...hensem guy sebelah kiri tu. Kenal?


Ya betulll! Itulah Riezman Khuzaimi. Aktor drama dan filem. Kalu sapa tengok filem seram CONGKAK, mesti kenal muka ni. Saya suka karektor MALIK bawaan Riezman dalam BAIK PUNYA CILOK.

Aik...Kelolopun dah bikin ruangan gosip ka? Tak..bukan sama sekali. Inikan blog MTB. Mestila ada kena mengena dengan MTB.

Rupanya Riezman ni, selain sibuk show business, sibuk jugak main MTB. Sempat jugak dia "baik punya cilok" ke trail-trail MTB di celah-celah kesibukan kehidupan selebritinya dengan geng PowerStik dia.

Bro Riezman tak cukup setakat itu saja. Dia melangkah lagi dengan ikut memeriahkan pasaran barangan basikal dengan aktif terutama di forum BicycleBuySell. Itulah yang mendorong pertemuan saya dengan dia. Bersungguhnya Riezman dalam berniaga barang-barang basikal ni hingga ada website sendiri di PowerstikXtremeWorld

Status selebriti tidak menjadikan Bro Riezman sombong dan eksyen. Berjumpa sekejap dengan dia terasa macam dah kenal lama kerana ramah dan mesranya. Berurusniaga dengan dia senang dan mudah. Cuma nak kena ejas masa sikitlah...Sebab maklum laaa..selebriti kan sibuk. Semoga Bro Riezman sukses dalam showbusiness dan bike business.

Wednesday, June 04, 2008

Bagaimana...Membuka dan Memasang Ampaian Belakang

AKUTAKJANJI (Baca ini dulu!!!) Penulis bukan orang yang berpengalaman dalam MTB, sekadar suka mencari, menyelidik, menyibuk dan mencuba sendiri. Penulis TIDAK bertanggungjawab sekiranya pembaca mengalami kemalangan, kecederaan, kerosakan harta benda dan wang ringgit akibat mengikuti saranan daripada artikel penulis. Apa-apa hal sendiri tanggung. Penulis juga mengalu-alukan kritikan, teguran, pembetulan dan seumpamanya untuk penambahbaikan artikel ini untuk manfaat semua. Untuk rujuk silang komponen yang disebutkan dalam artikel ini, pembaca boleh merujuk Anatomi Sebuah Basikal Gunung

Panduan ini akan menunjukkan bagaimana membuka dan memasang ampaian belakang. Contoh yang digunakan ialah Proton T-Bolt yang menggunakan sistem pangsi tunggal (single pivot). Panduan ini boleh juga digunapakai untuk basikal yang menggunakan prinsip dan cara pemasangan ampaian belakang yang sama dengan sistem yang ada pada T-Bolt. Keseluruhan proses boleh dikatakan mudah dan boleh dilakukan sendiri asalkan cukup alat kelengkapan.

Kita akan melihat bagaimana menukar ampaian belakang dari begini...


...jadi begini.


Jom kita tengok macam mana menukar ampaian belakang Proton T-Bolt dari Kind Shock A-Two ke Fox Float R.

...SEBELUM MEMULAKAN
Pastikan ampaian yang hendak dipasang menepati spesifikasi. Yang paling penting ialah panjang ampaian dari mata ke mata. Dan pastikan juga panjang penyendal (reducer) sesuai dengan braket pemasangan.


ALATAN YANG DIPERLUKAN

Alat yang diperlukan untuk menukar ampaian belakang Proton T-Bolt.

  • Allen key saiz 5
  • Allen key saiz 6
  • Spanar saiz 13
  • Tukul getah. Kalau tak ada guna bongkah kayu. Cuba sedapat mungkin mengelak dari menggunakan tukul besi


CARA-CARA MEMBUKA DAN MEMASANG AMPAIAN BELAKANG T-BOLT
Langkah Tindakan
1

Bukakan nat pasak atas.

Masukkan allen key saiz 6 pada lubang pasak sebelah kanan. Biarkan tuas allen key menegak ke atas dan condong ke hadapan sedikit. Ini akan berfungsi sebagai pemati pasak.


Pegang allen key yang telah dimasukkan ke dalam lubang bol pasak supaya pasak tidak berpusing bila spanar dipusing untuk membuka nat. Untuk lebih pegangan, letakkan posisi allen key pada kedudukan yang membolehkan anda memegang allen key sambil berpaut pada kerangka basikal. Gunakan spanar 13 untuk membuka nat pasak. Pusingkan ikut lawan jam sehingga nat pasak tercabut dari pasak.


2

Keluarkan pasak atas dari braket atas

Gunakan tukul getah untuk mengetuk pasak keluar dari braket. Ketuk dengan cermat dan tak terlalu kuat supaya alur pasak tidak rosak.


Bila dah ketuk kepala pasak akan terjulur macam ni di sebelah kanan. Gunakan alat yang berbentuk silinder sekira-kira muat lubang braket untuk menjolok pasak keluar. Dalam contoh ini, allen key digunakan sebagai penjolok.


Sebaik pasak tercabut, jangan dicabut allen key itu. Biarkan di situ sebagai sangga sementara supaya kerangka tidak "runtuh".


3

Keluarkan pasak bawah.

Gunakan allen key saiz 5 untuk memutar keluar pasak bawah. Pasak bawah tidak dimatikan dengan nat sebaliknya di sekeru pada plat braket sebelah kiri. Putarkan arah lawan jam sehingga hujung pasak terkeluar dari plat braket sebelah kiri.

Sekali lagi gunakan allen key itu untuk menjolok pasak bawah keluar dan biarkan allen key di situ sebagai sangga sementara.


4

Keluarkan ampaian lama

Pastikan pelana tergantung semasa mengeluarkan ampaian lama supaya kerangka tidak runtuh. Jika tiada penggantung, sendal ruang ampaian dengan sebatang kayu atau besi yang lebih kurang sama panjang dengan ampaian.

Dalam keadaan tergantung, cabut keluar allen key yang menjadi penyangga sementara dan keluarkan dari braket bawah dahulu. Kemudian baru tarik keluar ampaian dari braket atas.

5

Pasang ampaian baru

Dalam keadaan basikal masih tergantung, pasang ampaian baru. Mulakan dengan pasang pada braket atas. Sebaik masuk lubang atas dan selari dengan lubang braket, gunakan allen key sebagai sangga sementara. Masukkan allen key dari kiri ke kanan.

Masukkan pula lubang bawah ke dalam braket bawah dan laraskan supaya lubang ampaian sejajar dengan lubang pada braket.

Masukkan pasak bawah sehingga pasak menyentuh dan masuk ke lubang braket. Pulaskan dengan tangan supaya pasak masuk dan melekat pada braket.

6

Menyudahkan pemasangan ampaian baru.

Gunakan allen key saiz 5 untuk mengetatkan pasak bawah. Pulas ikut jam sehingga pasak terikat kemas.

Masukkan pula pasak atas. Tarik penyangga sementara perlahan-lahan sambil pada masa yang sama pasak atas dimasukkan. Kepala allen key akan bertemu dengan kepala pasak. Teruskan menarik allen key dan menolak pasak sehingga pasak masuk semuanya dan allen key tercabut.


Pasang nat pengikat pada pasak atas.


Masukkan allen key saiz 6 ke lubang pasak. Allen key ini akan bertindak sebagai pengunci pasak bagi mengelakkan pasak dari berpusing apabila nat diketatkan.


Dengan tangan kanan memegang allen key, gunakan tangan kiri untuk mengetatkan nat pasak.


7

Ampaian baru siap dipasang

Dahpun siap pemasangan ampaian baru. Opppsss...nanti dulu. Jangan terus melompat nak mencuba ampaian baru anda. Sebelum boleh dicuba, pastikan tekanan angin bersesuaian dengan anda. Rujuk Artikel Berkaitan...


ARTIKEL BERKAITAN...
  • Melaras tekanan ampaian belakang
  • Melaras lantunan (rebound)