Friday, May 30, 2008

New Shocking Experience?

Huh! So what happened? What was so shocking? Oh so the drama!

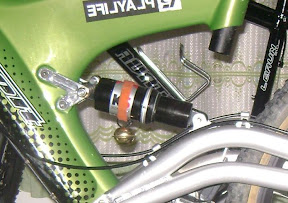
Relax...It was just my Bolty rear boinger got transplanted. The Kind A-TWO shock was shocked when it was removed from the frame. It's place is now taken over by a Fox Float R.


Kind Shock A-Two...before it was given the shocking treatment

Before...

Stock Kind Shock A-Two. 165mm (6.5") eye-to-eye. Basic entry level air shock. No rebound or lockout. You only get to play with the air pressure. Fat and stubby. Performance is a bit stiff and not so responsive. But the stiffness yield another advantage when climbing. Only minimal bob felt. I tried addressing the stiffness by lowering the pressure, it became bouncier but too soft. Easily bottom-out even when attacking small bumps. So, I resorted for stiffer setup. Better to be able to tackle bumps with no bottom out. Coupla years of riding a hard tail, small tremors to the brain is just child play.


2003 Fox Float R

After...

Fox Float R shock. Used unit bought from a celebrity. No kidding!

Shock Features

Adjustable Air Spring - Internal Floating Piston - Oil Damping - Self Adjusting Air Negative Spring - Nitrogen Charged - Speed Sensitive Compression Damping - Externally Adjustable Rebound Damping - Speed Sensitive Rebound Valve Stack

Rebound Adjustment

Rebound damping controls the rate at which the shock returns after it has been compressed. The red adjuster dial can be turned clockwise for slower rebound and counter-clockwise for faster rebound. There is a wide range of adjustment enabling the rider to tune the shock to any air pressure and riding condition. The proper rebound setting is a personal preference and varies depending on rider weight, riding style and riding conditions. As a general rule, rebound should be as fast as possible without kicking back and pushing the rider off the saddle when riding the bicycle in rough terrain. If rebound is too slow the suspension will not function properly and the wheel will not follow the changing terrain. Determining the proper rebound setting may take a number of rides. I am still in the process of trying out to find my sweet spot.


Wednesday, May 28, 2008

Little Big Thing - KCNC Jockey Pulley

I have problem with my drive train. Irritating rubbing gritting sound when pedaling. Sound amplified under exertion. Thorough cleaning and meticuluous lubing didn't solve the problem. Hmmmm...Sound seems to be coming from the LX RD and I suspected that the chain and the pulley were the culprits. Shifting was also not smooth with occasional chain skip and there was a slight feeling of drag when pedaling.

Then I saw an ad in the BicycleBuySell about KCNC alloy pulley. Interesting! Could be the solution to my problem. I quickly grabbed a pair from KSH TTDI which was offering at RM18.00 a piece. The one I bought was the 11T normal sealed bearing edition. KCNC also offer pulleys with ceramic bearing at a higher price. More details at KCNC website


Assortments of CNC pulley from KCNC. (pics taken without permission from KCNC site...)


KCNC jockey wheel features;
  • 7075 anodized alloy
  • Compatible with Shimano, Campagnolo and Sram
  • Colour : Black , Red , Blue , Silver,Green
  • Patented Design
  • Teeth: 10T, 11T, 12T, 13T
  • Ceramic Bearing available / 9g

Installation was quite simple. You dont even have to remove the RD. Just do "on frame" installation. Replace one pulley at a time. Snappy.


Installation completed.

Both jockey pulley and tension pulley for my LX RD replaced. Immediate test ride showed very distinguished performance. Pedaling felt lighter, smoother shifting and no more gritting noise. Yessss...But...too premature to jump in joy.


...little big thing.
A few sessions on and off road later convinced me that this small thing is indeed big in performance. I like it so much, I bought another pair for my wife. It doesn't only score in the look department but also excel in performance at a very affordable price. And, since it is made of aluminium, it should last longer than plastic pulley. If you are still contemplating to get one, don't!


Tuesday, May 27, 2008

Kenali Komponen Basikal - Bar Hendal MTB

Ini adalah siri 4 dalam siri-siri Komponen MTB dan disiarkan secara berperingkat atas dasar "bila aku ada masa". Penulis bukan orang yang berpengalaman dalam MTB, sekadar suka mencari, menyelidik, menyibuk dan mencuba sendiri. Penulis TIDAK bertanggungjawab sekiranya pembaca mengalami kemalangan, kecederaan, kerosakan harta benda dan wang ringgit akibat mengikuti saranan daripada artikel penulis. Apa-apa hal sendiri tanggung. Penulis juga mengalu-alukan kritikan, teguran, pembetulan dan seumpamanya untuk penambahbaikan artikel ini untuk manfaat semua. Untuk rujuk silang komponen yang disebutkan dalam artikel ini, pembaca boleh merujuk Anatomi Sebuah Basikal Gunung


BAR HENDAL MTB

Tertengok iklan Pirelli - "Power is nothing without control". "Kuasa tidak bermakna tanpa kawalan". Sebenarnya iklan tayar. Tapi saya rasa lebih kena kalau kawalan tu merujuk kepada pengemudian. Kalau pada basikal, apa lagi? Bar hendallah.

Bar hendal ialah satu batang yang disambungkan ke basikal pada bahagian hadapan untuk kendalian basikal dan sebagai pemegang kepada penunggang basikal. Kalau ikut definisi ni pening kepala jugak dibuatnya. Harap pembaca fahamlah.

Sedikit sejarah, bar hendal pada asalnya memanglah sebatang besi bulat tumpat. Sekarang sudah tinggal dalam lipatan sejarah. Semakin maju teknologi, rekaan bar hendal juga ikut sama berubah. Dari besi bulat padat kepada besi tiub. Dari besi kepada bahan lain yang lebih ringan. Aluminium, titanium dan gentian karbon.

Kita akan melihat jenis-jenis bar hendal yang biasa digunakan pada basikal lasak (MTB) berdasarkan jenis.

Umumnya, bar hendal MTB terbahagi 3;

  • Rata (flat)
  • Conget rendah (low rise)
  • Conget tinggi (high rise)

Kita akan berjumpa dua istilah kekunci bila bercerita tentang bar hendal, conget (rise), cangak (sweep).

Conget merujuk kepada jarak menegak di antara tempat paling rendah pada bar hendal dengan tempat paling tinggi pada bar hendal. Unit ukuran yang digunakan biasanya mm atau inci.
Cangak pula merujuk kepada kadar bengkok bar hendal ditarik ke belakang atau ke atas dan diukur dalam unit darjah.
*Nota : Istilah cangak dengan conget tu saya pandai-pandai reka sendiri. Tidak mendapat cop SIRIM atau cop mohor dari Dewan Bahasa dan Pustaka mahupun Dewan Bandaraya Kuala Lumpur.

Untuk memudahkan pemahaman maksud cangak dan conget, kita tengok gambar. Lagi mudah bercerita. Satu gambar menyatakan seribu kata. Chewah, sastera pulak. Rujuk gambar di bawah.

Kita ambil contoh bar hendal yang conget rendah.
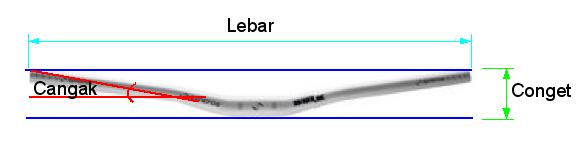

Sebatang bar hendal conget rendah yang tipikal.
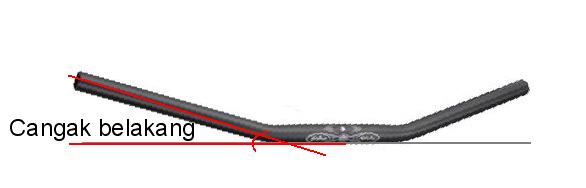


Cangakan belakang pada bar hendal rata


Jadi, nak pilih bar hendal yang mana satu ni? Macam mana nak pilih? Tengok keperluan. Faktor-faktor untuk pertimbangan...

Lebar

Hukum asasnya, lebih lebar lebih kawalan tetapi penukaran arah jadi lembap. Bar yang rendah dan sempit akan menjadikan anda lebih larus (aerodinamik) dan lebih cekap gunaruangnya bagi kayuhan jarak jauh. Pengayuh rentas desa biasanya lebih gemarkan bar dalam julat 56-58cm(22-23") manakala pengayuh gaya bebas (freeriders) dan penerjun bukit (downhiller) akan memilih bar yang lebih lebar.

Pada umumnya, lebar yang sesuai dianggar dalam zon tolak ansur di antara keselesaan, kawalan, daya tuil dan keyakinan, yakni berada di antara julat 100-150mm (4-6") lebih lebar dari lebar bahu. Ada pengayuh yang suka bar lebar untuk lebih daya tuil, yang lain pula suka yang kurang lebar kerana bar lebar meringsakan pergelangan tangan dan bahu. Anda kena cuba-cuba sebelum mendapat lebar yang sesuai.

Biasalah kalau membeli bar hendal, pengayuh akan membeli lebar sedikit dari yang diperlukan. Biasalah tu, prinsip "biar lebih jangan kurang". Kalau lebih boleh dipotong. Sebenarnya tak semudah itu. Rujuk ulasan selanjutnya di bawah. Dan perlu diingat, semasa ghairah untuk memotong bar hendal, pastikan cukup ruang untuk penggenggam, pengapit tuas brek dan pengapit penukar gear. Kalau pakai bar jenis gedebab (oversized) lagi kena berhati-hati sebab bahagian lengkuk semakin menggemuk. Pengapit penukar gear tidak lepas mengapit bar hendal yang gemuk...Saya dah kena dah!

Bahan

Kebanyakan bar hendal dibuat dari aloi aluminium. Keluli juga digunakan untuk membuat bar yang kuat dan tahan. Gentian karbon semakin popular untuk basikal-basikal mewah dan bagi mereka yang mahukan basikal bertambah ringan. Yang mahukan kelainan akan menggunakan titanium.

Debat bahan mana yang "terbaik" takkan habis. Jadi kita tinggalkan ke tepi daerah sensitif ini. Selain bahan, rekabentuk dan teknik pengeluaran juga mempengaruhi kekuatan dan ketahanan. Bar aloi boleh dibentuk secara dalaman atau luaran untuk mendapat kekuatan dan ketegaran pada tempat-tempat berbeza pada bar hendal untuk menanggung kepelbagaian beban dan siksaan. Ada juga yang diberi rawatan muka, (macam facial treatment kat salon pulak) menggunakan teknik "anodise" atau "shot-peened", untuk menutup titik lemah yang disebabkan ketidakrataan permukaan.

Memanglah susah untuk menentukan betapa malarnya mutu pengeluaran bar hendal di bawah permukaan, melainkan pengeluar melakukan ujian tekanan dan memperakui setiap batang bar hemdal yang mereka buat. Tekanan harga dan kos menyebabkan hanya beberapa pengeluar besar yang membuat perakuan.

Kalau mahukan bar yang paling kuat, teguh dan peramah (peramah???), pilihlah besi keluli. Lebih berat tapi lebih mantap. Kalau takdirnya anda terjatuh berdebuk bedebek, keluli tidak mudah patah sebaliknya hanya membengkok berbanding aluminium atau gentian karbon.

Conget dan cangak

Bentuk bar hendal, sifat yang sering dikaitkan dengan bar hendal, selain lebarnya, ialah conget dan cangak. Dua sifat ini mempengaruhi keselesaan dan prestasi kerana setiap pengayuh mempunyai lengan, pergelangan tangan dan zon selesa yang berbeza. Ikut selera masing-masing. Ada yang lebih suka bar rata dengan sedikit mencangak ke belakang. Ada yang suka bar menconget sedikit. Pendek kata, ikut selera, kesedapan dan kesesuaianlah.

Faktor-faktor lain yang mempengaruhi pilihan bar hendal termasuk ketinggian sepit udang, panjang tiub kepala, sudut tiub kepala dan tinggi reranting (stem).

Saiz pengapit (clamp)

Pada awalnya bar hendal datang dengan satu saiz umum 25.4mm (1") pada bahagian tengah di mana bar hendal dikapitkan dengan reranting yang sepadan saiznya. Lama-kelamaan keperluan kepada bar hendal yang lebih tegap dan kukuh mendorong pengeluar beralih kepada menghasilkan bar hendal yang lebih gemuk pada bahagian tengah. Bar jenis ini dikenali dengan "oversize". Saya lebih senang menterjemahkannya kepada bar "gedebab" disebabkan oleh rupanya yang "gedebab". Menggemukkan bahagian tengah ini menambahkan ketegaran bar dengan hanya sedikit peningkatan pada berat. Pada teorinya, kaedah in bagus walaupun mat-mat kapas (weight weenies) jadi seriau melihat pertambahan berat ini. Biarkan mereka dengan dunia mereka. Tadi disebut saiz reranting yang sepadan. Ha! Bertukar kepada bar gedebab memerlukan juga reranting ditukar kepada jenis gedebab. Kalau tidak...sendiri jawablah.

Panjang sangat? Potonglah...

Kalau bar dirasakan panjang sangat, potonglah. Eh...nanti...sebelum potong baca dulu arahan dari pengeluar. Kalau tak ada atau anda memang jenis tak pernah pedulipun manual dari pengeluar, ha lantak. Potonglah. Kalau waranti anda terbatal akibat pemotongan ini, jangan cakap saya tak bagi peringatan. Lu pikir la sendiri...(Nabil, jangan marah aaaaa)

Gunakan pemotong paip atau gergaji besi untuk memotong. Pastikan anda tahu dan mahir menggunakan kedua-dua alat ini. Pastikan juga pemotong paip yang digunakan dari jenis baik yang keras matanya dan boleh memotong dengan kemas. Salah guna pemotong paip boleh mengkemikkan bar hendal anda. Begitu juga kalau menggunakan gergaji besi, potongan anda boleh jadi senget. Potong dengan berhati-hati atau untuk hasil yang lebih baik gunakan pemandu gergaji.

Tanduk

Sekali lagi berhadapan dengan cabaran terjemahan. Sekali lagi saya menggunakan segala kuasa yang ada pada saya untuk menggunakan istilah tanduk bagi menterjemahkan "bar end". Yang ini bukan pandai-pandai saya sendiri, tetapi dikutip daripada apa yang didengar dan dituturkan oleh beberapa pengayuh. Hmmm...mengapa tidak? Memang rupanya macam tanduk lembu yang berkeliaran kat kampung saya.

Masih ramai pengayuh yang menggunakan tanduk, dengan sebab-sebab yang bagus pulak. Mungkin nampak kurang sesuai dan tidak menarik tetapi dua batang yang dipasang pada hujung bar itu memberikan pilihan kepada kedudukan untuk meletakkan tangan dan memberi tuasan yang lebih baik ketika mendaki dan dan keselesaan ketika meluncur pada laluan landai dan jauh. Kalau anda suka, pasanglah tanduk pada basikal anda. Pedulikan apa orang lain kata.

Beberapa petua

  • Gunakan penutup atau penggenggam yang ada penutup untuk menutup hujung bar yang ternganga. Hujung bar yang tidak bertutup boleh mengundang celaka dan melukakan kalau tercucuk atau tergeser bila terjatuh. Sakit woooo.
  • Juga pastikan reranting mengapit kemas bar anda. Kalau tidak, bar akan mudah bergolek di dalam cengkaman lembik pengapit. Permukaan bar boleh tergores dan terhakis menyebabkab munculnya titik-titik lemah yang boleh mengundag retak dan patahnya bar.
  • Jangan pasangkan pengapit tuas brek atau penukar gear terlalu ketat. Pasang sekira-kira sendat untuk tuas dan gear tidak bergerak. Kalau terlebih ketat, ia boleh merosakkan bar terutama bila terjatuh. Periksa selepas terjatuh. Perhatikan sekiranya terdapat kerosakan pada pengapit tuas brek atau gear terutama jika pengapit telah berganjak. Rosak yang sedikit boleh menjadi pemula kepada kerosakan yang lebih besar kemudian.
  • Cuba-cubalah beberapa kedudukan bar dan reranting. Cari kedudukan yang dirasakan selesa dan sesuai dan menambah prestasi kawalan basikal.

Semoga anda mendapat kawalan penuh ke atas basikal anda dan lengan serta pergelangan tangan anda selesa bermesra dengan bar hendal anda.

Tuesday, May 20, 2008

Polisport - Porta Bebe Dolphin

When the infectious biking virus attacked my family, nobody was spared. Of late, it claimed its latest victim, my 3 year old son. Now, the whole household is suffering a severe cyclosis. It could have been passed on from his mother when he was lactating.

There's no cure. Just occasional painkiller to kill off the pain. Painkiller in the form of biking. But he's too young too cycle. Momma came up with the idea of a baby carrier. Smart momma!

The plan to have a BBB family ride became the catalyst. Ride was planned on 18/05. So, when we came back from our FRIM ride that Saturday, we went looking for a suitable carrier. No stock at both shops that we went. But, we were in luck because Nathan of Bicycle World was generous enough to lend us his because the unit has just been returned by his customer after an oversea stint. Must be my lucky day...

It's made by Polisport, a Portugal founded company. Model is Porta Bebe Dolphin which can carry up to 22kg/48.5 lbs as stamped on the unit.


The unit completely installed
The carrier is rather simple. It comprises of 2 units, the seat and the mounting clamp. Really that simple. The seat unit is connected to the mounting clamp via 2 steel bars. That's all. Almost unbelievable.


The mounting clamp
The mounting clamp is made of plastic + rubber material. Strong and sturdy with some elastic rubbery property for firm strong grip. It's mounted on the seat tube and held in place by six bolts. 3 on each side.

Also in the combo are 2 pieces of rubber shim to cater for smaller seat tubes. It can go to as small as 25.4mm and as big as 31.6mm.
As safety feature to prevent the set from jumping of the mounting clamp, the right bar is notched. There's a spring loaded locking button on the clamp that will lock the notch to ensure the whole seat won't jump off.
Though simple, it is cleverly design to have a groove so that your FD cable can run cleanly thru for top-pull FD.
You have to try several times to get the right height so that the seat will have the correct elevation above the rear tire. Too high, it will affect your center of gravity and handling. Too low, it will rub off against the tire when it bounces. You also have to compensate for sag when the pillion is seated.


There! Complete installation. Happy pillion trying out.
There! Very quick installation. All you need is an allen key and you are good to go. One big disappointment though because the legs are left dangling like that without footrests. [Later I found out that the unit did come with proper footrests and straps but it was misplaced, lost and never found]
Albeit that, everything is good to go. Let's go and try it out...


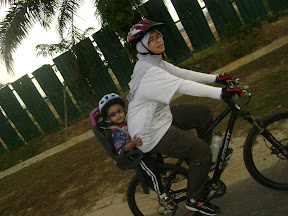
I'm safe. I got airbag...
...On tarmac. No problem.


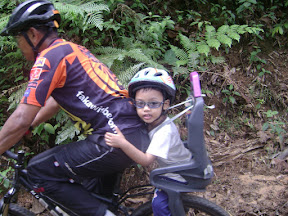
Woo hoo...do it again dad.
Off road. Have to limit to less bumpy road. We tried The Bukit Bujang and Balau trail. Trail was covered with dried leaves that act like cushion to absorb the bumps. Smooth ride. The ride down Rover and Bukit Hari was bumpier. I had to slow down to reduce the bobbing of the carrier. But overall...my boy enjoyed it very much...So, babysitter problem? Get a baby seater!


Monday, April 28, 2008

Kelolo 3 Major Transplant

When your wife doesn't cycle, you'll be very discreet about your purchase of bike and parts. When your wife starts cycling (and becomes obsessed)too, a visit to a LBS would be a blissful experience.

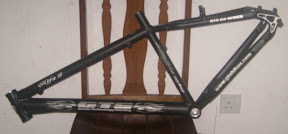
One fine evening after work, we went to a bike shop to buy helmets for the kids. e new stock just arrived and there, on the display rack, was a matte black GTS frame. I took a closer look. Touched, felt, groped and molested the frame. Matte black really had a soft spot in me. I held it up, waved it to my wife. She also took a look and before we knew it, we decided to purchase it...For RM280.00, it's a good buy. At least enough for my kid's requirement. It would replace the frame of Kelolo 3, which was a bit short for my eldest son who is growing and growing and growing...Now, he is taller than me...

So we concluded the other purchases, and left. It was already close to 2030hrs. when we got home. I hung the frame, complete in wrap on my makeshift bike hanger. At first, I decided to hold the installation till weekend. But my wife looked very enthusiastic about it. And...I too became restless and impatient to wait till weekend because of that. But...post dinner laziness got the best of me and I decided to just be a couch potato instead. 2130 hrs...


What's under the cover???

I shouldn't have hung the frame there. It was within view beckoning me to look at it again and again. Once I had eye contact, like a sultry seductress, she would whisper to me...

"Don't you you wanna see what's under the wrap?" "Come here handsome...rip this cover off me, touch me, caress me..."

That seducing whispers felt so close to my ears...The sound was so familiar...I could almost feel soft gentle warm wind blowing at my ear, carrying the whispers...


Taaa daaaaa....GTS Alfa 2 unveiled.
No wonderlah the whispering felt so close to the ear. No wonderlah I could feel the warmth that carry the whisper. It was my wife's doing. She also, was impatient. Couldn't wait to see how the bike would turn up. I threw a look at her..."Now?", I asked. Her eyes glittered, full of hope and excitement. Not a word. Just a simple nod.

Lazily, I heaved my stuffed self off the sofa. Like a phyton after gulping down a whole cow, I slithered across the hall, slowly and sticking my tongue out occasionally. After taking about forever to reach the bike hanger, I finally managed to touch the wrapped frame. Slowly, the pop wrapper was removed until the frame was stark raving naked.


Kelolo 3 before going under

This is the donor. Kelolo 3. 14.5" ayam brand frame. Its head badge says MERITA. Yes! No typo here. Lame huh....trying to imitate Merida. Too short for my boy. Trembles as it await in fear. Its limbs will be torn apart and transplanted to another skeleton. It's parts will be transplanted to the awaiting GTS Alfa 2. Procedure will be performed by Dr Kelolo.

Dr Kelolo surgical tools.

In view of the impending critical condition of the donor and the donee (don't try to wiki this, you won't find it), the transplant must be performed that very night. The surgeon prepped himself. Got all his surgical tools ready. Note the fluid in the 2 bottles? Those are drinking water to quench his thirst while performing the operation. What were you thinking?


Skinned Kelolo3

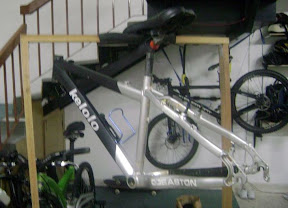
It was almost midnight. The surgeon was still hard at work. All the limbs and organs from Kelolo 3 were amputated and harvested. Process was painstakingly done. Fortunately, there was no complication. It was a bloody and gory affair. Limbs strewn all over the operation theater. It was messy, really messy. The surgeon labored on thru the night. Once in a while he would pause. All the stooping made his back sore with awful burning sensation. At that time he felt a great urge of getting a proper operating table...Later perhaps. A sip of the thirst quenching fluid, then he was back on his patients...


Recipient beginning to take shape

The clock kept ticking past midnight. Completion of surgery was far from finish. All the severed limbs need to be attached to the awaiting recipient. And job should be done with refinement, with finesse. The skinned Kelolo 3 hung helplessly like a slaughtered lamb. 0200 hrs.


My helpful young intern

This complete transplant was no small matter. Definitely not a one man's job. For that, I got my young intern to assist me. He was a great help in making the mess, messier. Also a great help in keeping the doctor awake with his antics. Several incidences of tool tug-of-war because he insisted that his need for the tool was far more important than the doctor'S. Often resulting in his scattering away with tools in his grab. Hmmmm...


Partially complete

After hours of painstaking effort, the recipient began to take shape. Major limbs and organs were safely attached to the recipient. The doctor took a momentary pause. Heaving a big sigh of relief. Only few bits and pieces more to go.


...almost complete

More hours passed by. The doctor was adamant in completing the procedures. The head nurse tried to console the doctor to just stitch up and continue in another operation. At that stage, it was sufficient and safe to abort the operation without jeopardising the recipient. Doctor won't give up easily. Snag encountered because of the nerve and veins harvested from the donor were insufficient in length for the recipient. A common problem when performing a transplant. Doctor knew that could happen, based on his previous experience. Normally he would come prepared with spare nerves and veins but because of the emergency nature of that operations, that matter was neglected.

Doctor tried getting the nerves and veins from his personal stash or parts and organs but to no avail. In the end, at almost 0400hrs, doctor threw in his surgical mask.


GTS Alfa 2 later, much later...
No transplant op could conclude in just one operation. After the major op, there were several few more ops done for refinement and corrective surgery. This was how GTS Alfa 2 with organs and limbs harvested from Kelolo 3 looks after several small corrective and cosmetic surgeries. Now, what should we name this baby?

Friday, April 25, 2008

GLC Kayuhan Malam Antarabangsa

Gombak Lame Cylcists (GLC), yang baru ditubuhkan secara mendadak dan kelamkabut, diam-diam dah buat 2 nite ride. Kali pertama dari Gombak ke Selayang Hot Spring pada minggu lepas, Khamis 17/04/08. Dan semalam, 24/04/08, telah mengorak langkah sehingga peringkat antarabangsa. Tak percaya?

Kayuhan semalam disertai oleh 2/3 bilangan ahli (2 daripada 3 orang :mrgreen: ). Bermula dari Dataran Sri Gombak, pengayuh handalan ini, berbekalkan lampu kelip-kelip dan lampu kepala yang diubahsuai dari lampu LED paar malam, telah memulakan kayuhan pada 9.30 malam.

Laluan awal adalah Jalan Gombak melewati Greenwood seterusnya membelok kanan pada Simpang Tiga. BC telah membawa Shaque melalui kawasan elit Taman Harmonis untuk melihat rumah-rumah yang tersergam di situ sambil bermain-main laluan dakian kecil.

Dari Taman Harmonis, BC menghidangkan dakian (bukan daki tau) kepada Shaque yang memang pelahap mendaki. Bukit Taman Perwira diratah dengan lahap sambil borak-borak kat henpon saja. Melihatkan itu BC rasa tercabar lalu menambahkan lagi sajian mendaki ke Taman Setia. Mencungap jugak laaaa...Tapi Shaque masih steady. Chehhhh...

Dari Taman Setia beredar ke Taman Melati juga masih dalam mood mendaki. Cuma mujur dakian tidak curam menuju ke simpang MRR2. Terus menyusur laluan MRR2 ke Melawati pada kelajuan chain ring besar + cog kecik. Jarang-jarang dapat peluang macam ni kalu masuk off road. Merasa jugak chain ring besar tu bekerja...

Sampai persimpangan MRR2 - Jln Genting Kelang, kami lipat kiri masuk ke Melawati dengan kayuhan santai. Santai sekejap saja sebab selepas belokan pertama di depan Sekolah Antarabangsa, bukit menanti di depan. Tapi sebab jalan gelap, tak la berapa nampak sangat. Tiba-tiba saja rasa berat...Oooo...mendaki rupanya. Seronok kayuh malam pelan-pelan ni. Dalam dok pulun kayuh, terpaling ke kanan dan nampaklah bertaburan segala macam jenis lampu dari Bandaraya Kuala Lumpur. Dari lampu limpah (floodlight, lampu neon, lampu kalimantang dan bagai lagilah. Yang tak nampak cuma lampu minyak tanah...

Dah sampai puncak, biasa la, turun pulak. Tengah syiok dunhill separuh jalan kena belok kiri. Naik lagi! Killer punya climb. Kalu siapa biasa ride Bukit Yusof Haslam musti tau climb ni. Steep climb dua fasa. Perghhhhhh! Sebaik melewati rumah Yusof Haslam, kena meronot bawah palang jalan. Bontot ke belakang belakang saddle laaa...Elok lepas lipat kuang nak lalu bawah palang tu, Shaque terjerit sekejap kedian berhenti. Rupanya, lepas off saddle tu, dia tak leh panajt balik sebab seatpost setup road tinggi giler. Tak boleh panjat balik...Nak gelak ke tak nak gelak...Jalan gelap sebab jarang dilalui. Hanya diterangi lampu suluh kepala cap ayam pasar malam...

Turun dari situ, belasah ke Melawati manghala ke Zoo Negara. Kayuhan diteruskan melalui MRR2 dengan keriuhan dan deruan trafik laju kat MRR2. Ada kemalangan berlaku di situ. Sorang mat motor dah terbaring atas jalan. Kami jadi seriau nak berenti terus kayuh kedian belok kiri ke Ukay Perdana. Kedian belok kanan ke Bukit Antarabangsa. Terus mendaki dengan mencungap-cungap. Shaque nampak cool n steady saja. Bikin satu loop kat situ dan keluar kat Giant/Petronas. BC dah tak tahan...perlu berenti. BC bagi isyarat berenti sambil jerit kat Shaque..."Penat weeeiiii...!!!". Shaque jawab balik "Laaa...ingatkan ko tak tau penat. Akupun penat jugak...". Tau penat jugak rupanya Shaque. So, GLC berehat kat Stesen Petronas Bukit Antarabangsa. Penat, peluh berjeruk tapi puasssss.....

Haaa...perasan tak kenapa ride tu dinamakan ride antarabangsa? Bukan sebab mendapat pengiktirafan UCI, bukan jua sebab ada penyertaan antarabangsa tapi...sebab kami lalu dua tempat "antarabangsa". Satu sekolah antarabangsa, satu lagi Bukit Antarabangsa. Kui...kui...kui...

Lepas rehat 15 minit, 2 botol revive + 2 power stik, kami turun balik Bukit Antarabangsa, lalu balik jalan Ukay Perdana masuk ke Keramat. Kemudian melibas masuk ke Wangsa Melawati. Jerih jugak memanjat bukit depan Carrefour. Sambung lagi deraan dengan bukit-bukitan sekitar Wangsa Maju.

Dari Wangsa Maju melajak balik ke Taman Melati. Kemudian masuk ke Gombak Setia langsung balik ke Jalan Gombak. Mujur jalan balik ni lebih memaafkan. Kebanyakannya landai lagi rata. Dari jalan Gombak, menyimpang masuk ke Greenwood lalu singgah kat Kedai Zed tomyam. Minum kopi ngan nasik lemak...Jarak di situ tercatat pada komputer Shaque 35km...Perrrrgghhhh...patutla penat. Tu baru kayuh main-main tu. Biasala bila dah melepak kat kedai kopi, macam tak ingat balik. Dekat kol 12.30 barula kami beredar balik. Selesai satu kisah kayuhan malam antarabangsa oleh GLC.

Minggu depan? Kalu jadi, GLC akan bermain sirkit Bukit Tunku dan Tasik Perdana. Siapa nak join?

Wednesday, April 23, 2008

Bagaimana...Memasang Braket Bawah Jenis Umpar Segiempat Menirus

AKUTAKJANJI (Baca ini dulu!!!) Penulis bukan orang yang berpengalaman dalam MTB, sekadar suka mencari, menyelidik, menyibuk dan mencuba sendiri. Penulis TIDAK bertanggungjawab sekiranya pembaca mengalami kemalangan, kecederaan, kerosakan harta benda dan wang ringgit akibat mengikuti saranan daripada artikel penulis. Apa-apa hal sendiri tanggung. Penulis juga mengalu-alukan kritikan, teguran, pembetulan dan seumpamanya untuk penambahbaikan artikel ini untuk manfaat semua. Untuk rujuk silang komponen yang disebutkan dalam artikel ini, pembaca boleh merujuk Anatomi Sebuah Basikal Gunung

Panduan ini menunjukkan bagaimana cara memasang braket bawah (BB) jenis segiempat menirus (square tapered spindle). Kita akan bermula dengan perumah BB yang sudah kosong dan sedia untuk menerima BB.

Panduan ini berguna bila nak servis BB atau nak pasang BB baru. Boleh juga diterima pakai untuk pasang BB jenis umpar bergerigi (splined) IS (juga disebut Octalink) asalkan mangkuk penutup BB tu jenis 20 gerigi.

Mari kita perhatikan macam mana rupa BB ni...


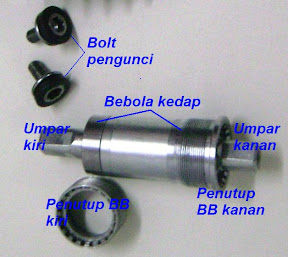
Braket bawah yang tipikal
Haa...macam nilah rupa BB yang tipikal. BB umpar IS 8 gerigipun lebih kurang jugak rupanya melainkan umparnya saja yang bergerigi, bukan segiempat sama menirus.


ALATAN YANG DIPERLUKAN

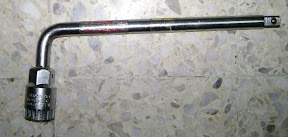
Alat wajib ada. Alat BB 20 gerigi untuk mangkuk penutup BB.


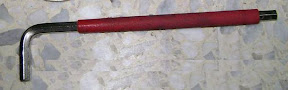
Bergantung kepada jenis bol pengunci. Jika bol pengunci jenis hex, maka allen key saiz 8 ini diperlukan. Ada juga pengunci jenis bol/nat saiz 14. Pilihlah alatan yang bersesuaian.


...SEBELUM MEMULAKAN

Perumah BB bagi Proton T-Bolt. Perhatikan tiada sambungan dengan tiub pelana. Unik untuk kerangka jenis Y. Derailer depan jenis plat.
Perumah BB dah siap. Segala kerak-kerak, selut, tanah, minyak lama dah dibuang bersih. Periksa untuk pastikan alur bebenang masih baik. Tidak pecah atau melebek.

Sediakan juga kain buruk untuk mengelap.


CARA-CARA MEMASANG BRAKET BAWAH
Langkah Tindakan
1
Sapukan sedikit gris pada keliling mangkuk pada alur bebenang untuk pelinciran dan kedap air.
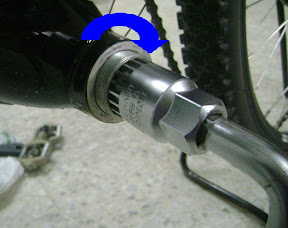
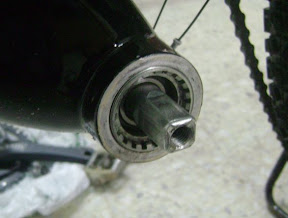
Masukkan umpar kiri sehingga mangkuk kanan bertemu muka perumah BB sebelah kanan. Pusingkan mangkuk penutup ikut arah lawan jam dengan cermat supaya bebenang tidak bersilang. Kalau terasa ketat dan susah dipusingkan, kemungkinan bebenang bersilang dan kemasukan tidak sekata. Keluarkan semula dan masukkan dengan berhati-hati supaya kemasukan lancar dan mangkuk penutup mudah dipusingkan.
2
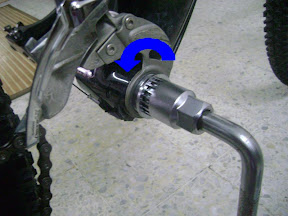
Bila penutup kanan sudah masuk elok, gunakan alat BB untuk mengetatkan penutup kanan. Pusing ikut arah lawan jam sehingga penutp kanan masuk rapat dan kemas. Ketatkan ikut kadar tork saranan pengeluar.
3
Griskan alur bebenang pada penutup kiri. Seperti tadi, pasangkan dengan cermat supaya bebenang tidak bersilang. Pastikan kemasukan tidak ketat atau tersekat. Pulas ikut arah jam hingga ketat.
4
Masukkan alat BB 20 gerigi pada penutup kiri dan pulas ikut jam. Kekuatan tork ikut saranan pengeluar
Dah siap! Ginilah rupa BB yang dah siap dipasang. Sedia untuk menerima pemasangan engkol
ARTIKEL BERKAITAN
  • Memasang engkol jenis umpar segiempat menirus
  • Memasang BB jenis umpar IS/Octalink

Tuesday, April 22, 2008

GLC Selayang Hot Spring Nite Ride

A planned ride but did not materialise would be disappointing. Mostly because of the weather factor. On the other hand, unplanned ride but really happened gave double pleasure. Perhaps because of the spontaneity...

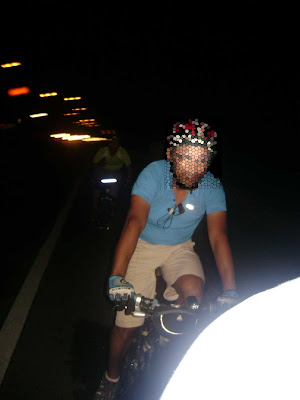
The newly founded underground Gombak Lame Cyclists (GLC) had had that experience. Our inaugural ride was instantly planned. Coupla calls late in the evening got me, Shaq and one anonymous rider (AR) (his identity had to be concealed because of his illegitimate methods of acquiring ride permit from his Minister of Home Affairs) rendezvousing at Sri Gombak BHP. Shaque complained because I was on slicks while they were on knobbies...I just shrugged.

The plan was quite simple - Ride from Sri Gombak > Tmn Pinggiran > Kg Laksamana > Selayang Baru > Hot Spring >>>> BREAK <<<<< > Jalan Bidara > Lebuh Raya Kepong - Selayang > MRR2 > Batu Caves.

At 2130 hrs riders congregated. A newfound friend, Sepitudang, met up with with us just to get to know each other. Thanks bro...Nice knowing you. Next time bring your bike along.

From BHP petrol station we moved to Sri Gombak making a quick stopover at CIMB bank. AR need to fleece the steel box for some cash. Then, without no more further ado, we traversed Lebuh Utama Sri Gombak. A cruel opening. Long and steep hill. Then, naturally, after the summit, downhill would follow...Zoomed we went towards Taman Pinggiran. A quick stop there because AR was left behind...

Shaque...
I need brighter lights...

Once he caught up, we moved on. We passed by a pasar malam. AR wanted to make another stop at the pasar malam because he was the one with plenty of money. We had to drag him from the magnetism of pasar malam.

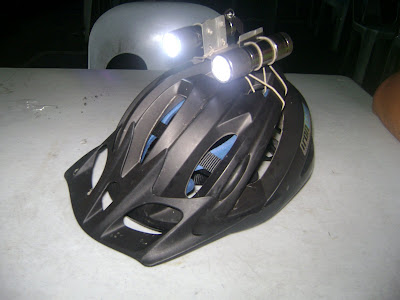
We made a left turn into Jalan Laksamana 2. The lavish streetlight was no longer present. Dim lights from my double barrel headlights almost caused my to fall into the scattered potholes on the road. It made me realised that my battery was weak and need replacement. Made mental note to look for shop afterward.

AR...Kampung Laksamana

So all the way on Jalan Laksamana 2 that converged with Jalan Laksamana. We took a right at the T junction then left which took us to Jalan Sungai Tua (B23). Traffic was a bit heavy. Had to tread carefully to cross the road to make it to the junction for Jalan Besar Selayang Baru.

So off into Jalan Besar Selayang Baru then turned right at the traffic light into Jalan 11. Moderate traffic as opposed to chaotic traffic during daytime. Went further ahead for another traffic light then we turned left into Jalan 29. We made a quick stop at the kedai there allowing me to get new batteries. The sight of cyclists with the "racing look" complete with lighting gears was not common sight and, as usual would attract attention of the onlookers.

Batteries replenished plus few quick gulps of the 100plus, we trodded on. Taking turns in playing the lead. Perasan Tour de Selayang la a bit...Another traffic light in our path and suddenly Shaque sprinted like a lipas kudung. I suspected because he was scared of the cemetery on our left at Jalan 35A. Sprinting continued. I was panting but in pursuit. AR decided not to participate in that nonsensical race.

Shaque continued the fast pace passing along the roundabout than onto Lebuhraya Kepong Selayang. We got along break there waiting for the traffic lights to turn green in our favor. Long enough to enable us to take some photos.

T minus 20 minutes and 22 seconds to green light

Light went green and off we went. It was my turn to sprint then. Large chainring + smallest cog = Shaque left behind...far far behind. Running on slicks gave me more unfair advantage. Moderate traffic on Jalan Ipoh (Route no 1) in pitch dark night. Glimmer of lights emanating from the hot spring visible from afar. I kept sprinting, forgetting about the promise of having a "makan kacang" ride...

Time was 2230hrs. We were surprised to see big crowd still flocking the hot waterhole. We spent 20 minutes dipping our feet in the warm water. There were 3 pools there. Each with different heat level. The one that we chose to dip our feet was the coolest. I remembered visiting the place years back. There was no cement embankment. No stalls...Nothing. Just the hot springs surrounded by bushes...How things have changed.

Feet dipping in the hot (warm) spring. So soothing for the sore legs...

From hot spring, journey continued. We took the slip road off Jalan Ipoh into Jalan Bidara. A change of pace from mostly flat to undulating roads of Jalan Bidara. Road was dark but fortunately very little traffic. Shaque seemed to enjoy tackling the climb and we let him off to enjoy his knee enhancing session...

From Jalan Bidara, we veered right back into Lebuhraya Kepong - Selayang. We passed by the junction to FRIM. My mind was thinking of having a nite ride in FRIM. Would that be possible??? I'll leave that question open. On on towards MRR2. Time around 2300hrs. The usual bustling and fast traffic on MRR2. Another round of pursuit game between me and Shaque. And, once more, slick tires proved to be really "slick". Batu Caves temple looming ahead while struggling on the flyover. Quite a challenging ascent.

Shaque breaking away
AR drafting behind
View from my cockpit...Not much to see actually
AR...thinking hard for bullet proof excuses to be presented to his Minister of Home Affairs
Ipoh? No...Kuantan? No...Seremban?? No..no...Batu Caves? YESSSS!!!
Approaching the Batu Caves slip road

We slipped out at the Batu Caves exit. Went underneath the flyover and into the forays of light industry factory in Batu Caves industrial area. Pit stop at Restoran Esfan for a night cap before departing for home. Time 2315hrs. Distance covered 25km. Satisfaction 100 percent...When can we do it again???

My hack of double barrel head lights. Cost RM15.00
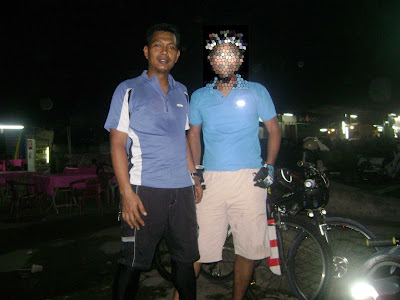
GLC members before departing. AR was still in deep thought of finding plausible excuses for his Minister of Home Affairs

Monday, April 14, 2008

City Slicker Part II - TTDI to Home

Continued from City Slicker - Part 1

After dodging thru bustling late evening traffic, making silly and stupid detour, I made it to TTDI. Made a stop at TTDI Petronas for magrib prayer. Sky was clear. Looking forward to the ride. The first road nite ride on MTB.

But fate changed in a matter of minutes. When I opened the door of the surau after performing my obligation, my jaw dropped. Water falling from the sky...It rained. Not heavy, but enough to call off the ride. Time was 2000hrs. I prayed that the rain would stop in half hour.

Lazily, I pedaled slowly to KSH. Chucked my bike in front of the coffee shop next to KSH. Killed time by browsing the stuff at KSH. 2030 db SMS that he was on his way. Rain still pouring down...

2100 hrs, db arrived with ckng. We made quick introduction and began to assess the situation whether or not to ride. 2 ironmen were busying themselves prepping to ride despite the drizzle. I was tempted to ask the ironmen whether we could follow them. Wise thinking stopped me from doing so. Those metal dudes were on roadbikes. And, they were ironman athletes! I would be distrupting them with my ayam brand MTB and my ayam brand speed and stamina. Better not...

We decided to just "ride" in the coffee shop. So off we went...Later, Brader Bob joined us. His new bike, a Nomad, had just been completed by KSH crews. We spent some time admiring his new rig. Total cost hovers around 23K. Twenty three big grand! Whoa!!!

I called up Udang, who was about to fall into deep slumber especially on a cold rainy night. He took the trouble to drive to TTDI from Kelana Jaya to join us for the Kedai Kopi ride...I'd never met hime before. Just chatting on BBS forum. But that's the beauty of the biking community. We were like no strangers. Just like close friends who had known each other for ages...

2230 hrs. It was getting late. Rain subsided. The shop owner was hinting for us to leave by packing up and cleaning the shop. On that cue, we departed.

I geared up. Heavy backpack on the back. Office's attire in some spares for emergency. Lighting checked. All set to go. Gombak...hmmm...20KM to go. I psyched myself not to think too much of the distance. It's the journey that counts.

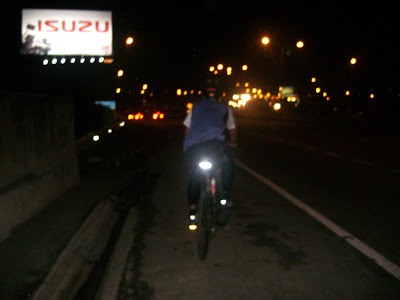
2245 hrs, tires roll. Bye-bye TTDI. Off into Jln Tun Mohd Fuad then Jalan Damansara. Traffic still heavy. I had to tread carefully. Puddles of water everywhere. Front tire squirted continuous flow of water to the face. Sheeeshhhh...

Again, largest chainring was put to good use. Felt heavy at first,but once momentum gained, it felt lighter and lighter. I maintained a moderate cadence. Cruising around 20km/h estimately. Traffic began to thin down as I approached Pusat Bandar Damansara.

To conserve energy, I decided to avoid all flyovers. The first one being the one near Eastin Hotel after the toll. The traffic light could become a good excuse for stopping. Then the one near Pusat Bandar Damansara. The pace changed there because of the climb. One important thing to note when you chose that way is that you'll have to switch lane back to the main lane if you want to go straight on. If there's a slip road there, be extra careful when converging back to the main lane.

Another challenge faced after turning in into Jalan Duta. Long climb but fortunately not so steep. Arrghhh...But there's allways a reward after completing a climb. The downhill...I glided all the way till the junction to the Jalan Duta old government complex. Traffic light was red...Not good when you were going downhill...

From Jalan Duta, straight on to the roundabout to Jalan Ipoh. Lesser traffic as night grow older. But one thing about lesser traffic was that, it'll faster traffic. Cars having clear lane tend to speed faster. Switching lanes would be trickier...

From Jalan Ipoh, I turned into Jalan Perhentian, then continued with Jalan Haji Salleh that eventually merged back to Jalan Sentul. All were flat roads. Jalan Sentul brought the smell of home stronger and stronger. A glimpse at the watch showed 2315hrs. Excitement...excitement. All of the sudden, I felt a surge of power kicking in. Cadence gradually increased as smell of home grew stronger and stronger.

I went past Sentul Pasar, then veered right into Jln Kampung Bandar Dalam. DUKE constructions at the junction to Karak Hiway caused congestion and traffic will slow down. A good chance to pick on motorists. "Hey look, a bicycle overtake you...".

Arriving at the junction was as good as arrival already. A quick left after the junction. Then into the nooks and crannies of Kampung Padang Balang...Voila...I was home. Approximately 21km of solo, after rain, wet nite ride...Phewwww...

Wednesday, April 09, 2008

City Slicker Part 1 - From Chow Kit to TTDI

Monday, April 7th. What was meant to be a brief visit to bicyclebuysell.com, turned out to be a huge self deception. Chats about PCC road nite ride TTDI > Damansara Heights struck my interests and hooked me on. I decided to join. Other fellow MTBers decided to join were db and ckng. The rest, including kevinhan will be riding their roadies.

That night, took some time to prep the bike. Bike of choice - my son's GTS Alfa 2 bike. Changed the tires to 1.5 skinny. Checked the lights to ensure in good working order. Office garb packed into my bladder bag. All set...

Tuesday Morning came. Rode to office. Felt slight difference after being so used to fat knobby tires. Skinny 1.5 glided lightly on the tarmac. Felt easier and lighter when pedaling. One setback though, I dare not rough it up by climbing over kerbs like when I am on fat knobby. Usual routine of freshening up and change upon arrival.

More BBS chats during the day sparked the anticipation of the coming nite ride. By 6.00 p.m. I was all geared up and set to depart for TTDI. I decided to take the Jln Raja Laut > Jln Putra > Bukit Tunku > Mahameru > Jln Duta > Jln Semantan > Jalan Damansara. Before the turn from Jalan Duta into Jalan Semantan, a vague memory recollected a cut thru road that could exit at Pusat Bandar Damansara. Without much further thinking, I veered into Jalan Bukit Ledang, one turn before Jalan Semantan. Sun was setting. Gloomy sky. A steep ascent welcomed me. I pushed on. Consoling myself that it was worth diverting. Much distance will be saved. After about 50 meters, the road leveled momentarily then turned into a sweet downhill. I looked like the road was leading towards Pusat Bandar Damansara, but... all was like a mirage. I came to a halt at a dead end. Dang! Time check 7.30 p.m.

Unlike typical prejudice for american gentlemen in refusing to ask for direction, I opted to flag down a car and ask for direction. The driver looked at me suspiciously. Reluctantly wound down his window and asked thru that small opening. I confessed without shame that I was lost. Perhaps, after ensuring that I was not hostile, he wound down his window fully. Oh..a sikh family. I couldn't get a good look before b'coz they have tinted mirror on. Generous and kind sikh explained the way out. Even offer me to grab on to his car to tow me out of my predicament...I politely declined. They moved on leaving me there catching my breath an looking at the looming ascent. Some dogs looked on behind the fence...Two of them already put on their fierce face. Fangs wielded...Ready to let out their noisy barking...Nice doggy, nice doggy.

Gently, I turned my bike around without making any sudden move. Good...no sign of barking and yelping. Slowly mounted the bike. In the twilight, I pedaled away without looking back. Bye bye doggy.

So, up back the tarmac. Momentary climb then swooped down a long downhill. My fighting streak was still not giving up. Instead of making my exit, I decided to explore further to try to find the way to Pusat Bandar. There was a right uphill turn which I decided to take. Decision made too swift. I misshift and the chain sucked. I ground to a halt. No choice but to shove the bike up. Luckily the climb was short. I hit left to what I thought was the way to Pusat Bandar Damansara. Coupla ups and downs followed until I came to a junction that look like a convergence between the small road and a bigger hiway. I heaved a big sigh of relief. Congratulating myself for the victory. I increased my cadence to hurry up to reach the junction. As I approached, truth began to dawn (set?) upon me. I was actually back at Jalan Duta. Further back before I turned into Jalan Bukit Ledang. I had actually made a big detour...Very smart, very smart indeed...A short moment of dismay.

(Later I checked back the map and found out that there was no more connection between Jalan Duta and Pusat Bandar Damansara. The old connection was already severed. Well, at least that was what the map say)

Took a moment silence to recompose myself why pedaling lazily. Set back my focus to getting to TTDI soonest possible. Let out a huge exhale. Picture of KSH and TTDI gradually become bigger and clearer like zooming down using the GoogleEarth. A sip of water from the tube and slowly the cadence began to increase until I came to steady rhythm. Before long, Jalan Semantan was in sight. I took the turn maintaining cadence and shifting down to compensate for the gradual increase in gradient. Some climb that was making me gaspfor air and at the same time fighting the tingling sensation in the thighs and calves. I fought hard to fight the evil voices telling me to take a break.

Moment of torment turned into moment of joy once I passed the peak. The roll down was long, very long and I relaxed myself from pedaling until approaching the turn into Kerinchi Link. What a joy!!! Beaing able to use the largest chainring is a rare occasion. At that moment, the largest chainring was used to the fullest...It's about time you start to wear out you big ugly full-of-teeth monster chainring.

I rpoceeded along E23 Lebuhraya Sprint. Evening traffic was chaotic and I decided not to go through the toll plaza. Took the slip road by the Sprint hiway. Dodging the crawling traffic was such a joy. Imagine a bicycle can travel faster than a car! So there I was, overtaking all the automobiles all the way to TTDI. 1945hrs...I made a stop at Petronas TTDI for mahgrib prayer. Weather was clear, it shall be a good ride tonight...

...continued in City Slicker Part 2.